Showing posts with label Recipes. Show all posts

19 January 2012

Reindeer Calzone – Recipe

Calzones are a great portable dish, but I prefer to eat mine while slumped in front of the TV, remote control in one hand and a cold beer in the other. I tend to save it for when I've had one of those days as there's something very comforting about the crisp, yet chewy dough, combined with the molten hot interior of tomatoes and mozzarella.

Italian tradition dictates that calzones are filled with leftover vegetables, but you can pretty much add anything you like. Here's a little Nordic twist on this classic dish that uses reindeer salami instead of the more popular pepperoni.

26 September 2011

Norwegian Baked Cheesecake with Brunost-Pecan Caramel – Recipe


I'm a cheesecake fiend. I absolutely adore the stuff. Not those insipid excuses made with gelatine, mind; I can't abide those. No, what I usually crave is a proper Nuuu Yoik baked cheesecake, with its creamy sour tang. Nothing else will do.

31 August 2011

Jarlsberg, Onion & Mushroom Tart – Recipe


Jarlsberg cheese is one of Norway's most famous export products, and it's enjoyed across the country. Although this cheese dates back to the 1850's it wasn't until the 1950's that today's familiar yellow wax-covered cheese was created. Jarlsberg is quite similar to Emmenthal or Comté, with mild sweet nutty notes to it and it's great to use in cooking.

31 May 2011

Røros Butter Caramel Ice Cream – Recipe


You wouldn't know it by looking out of the window these days, but summer is just around the corner in Oslo. So in anticipation of those long balmy days I thought I'd dust the cobwebs off my ice cream machine and fire it up for a metaphorical spin around the block. Plus there was also the non-trivial fact that it was a Sunday and we were clean out of ice cream, and in the Nibbler household we always, but always, have ice cream on a Sunday. It's practically the law.

27 May 2011

Rhubarb Cordial and a Rhubarb Gin & Tonic – Recipe


We're just starting to enter the rhubarb season here in Norway, and after spotting some decent specimens in the supermarket the other day I threw a few stalks in my shopping trolley without any particular plan as to how I'd use them. I love rhubarb, but it's not something I use that often. I had vague ideas of making a rhubarb crumble, but apathy got the better of me. Until, that is, I thought of making a rhubarb drink. Here was a ludicrously simple way of getting a lovely hit of tart rhubarb. I couldn't not give it a go.

23 May 2011

Brunsviger – Recipe


This weekend I found myself with a craving for something sweet and starchy. With limited ingredients in the house, I decided to make the popular Danish dish of Brunsviger. Some say its name derives from the German city of Braunschweig, while others say it originates from Brunsegård in the Danish town of Tommerup. Either way it is intrinsically associated with Fyn (Funen in English), the Danish island where Hans Christian Andersen was born, some 150km west of Copenhagen.

31 March 2011

Shakshuka – Recipe

Shakshuka has its origins in the Maghreb – the Arab West. Today it is a popular and delicious breakfast or supper staple across North Africa and the Middle East. The name roughly translates as “mixed up,” and at its core is a dish consisting of tomatoes, onions and eggs. Interestingly, and I'm not sure of the reasons, shakshuka was a dish traditionally prepared by the men of the household.

There are myriad of shakshuka variations. Some add peppers, others feta cheese. Sometimes the eggs are cooked in the tomato sauce; sometimes they are scrambled, poached or fried separately. There are even some recipes that add meat to the dish (I've heard that in Libya it is not uncommon to have shakshuka with gideed, a type of dried salted lamb). There aren’t really any ‘proper’ versions, so feel free to experiment. This recipe is the one I remember from my childhood and therefore, by definition, it is the best. Of course, I may be a touch biased!

These days I love making shakshuka as part of a lazy weekend brunch. There’s something so comforting about the sweet smell of onions and garlic cooking gently on the stove. If you like, though, you can make the sauce in advance and then reheat and drop in the eggs when you are ready to eat. I like to cook the eggs so they are still soft, allowing the oozing yolk to mingle satisfyingly with the tomato and onion sauce. In my opinion shakshuka should always be served with a stack of warm pita breads and lots of hot, sweet tea.
Ingredients (serves 4)
  • 4 eggs
  • 2 medium onions, roughly chopped
  • 5 fresh plum tomatoes (about 600g worth), chopped (you can of course used tinned tomatoes, but I think fresh ones work better for this dish. I don't bother to peel the tomatoes – life's too short for that).
  • 1 garlic clove, crushed
  • 1 tsp ground cumin
  • ½ tsp turmeric
  • 75ml water
  • A handful of flat leaf parsley, chopped
  • Olive oil
  • Salt and pepper to season
Method
  1. Pour a couple of tablespoons of olive oil into a frying pan. Add the onions and cook over a gentle heat for 7-10 mins until they are soft and golden (you don't want them to brown).
  2. Add the garlic to the onions and continue cook for a further 5 mins until the onions are just starting to caramelise.
  3. Sprinkle over the turmeric and cumin and cook for another minute or so to temper the spices. 
  4. Add the chopped tomatoes, turn up the heat a bit, and simmer for 5-10 mins.
  5. Add the water to loosen mixture a touch (you may need more or less depending on the moisture of the tomatoes, but you're aiming for a consistency like pasta sauce). Season to taste with salt and pepper.
  6. Make four little wells in the mixture and break an egg into each one.
  7. Cover the pan and cook for 5 mins, or until the eggs are done to your liking.
  8. Sprinkle with flat leaf parsley and drizzle with extra virgin olive oil. Serve with lots of warm pita bread and sweet Assam tea.

28 March 2011

Beef Rydberg – Recipe

For dinner recently I decided to take a little excursion to Sweden. Not literally of course, but culinarily. As much as I love cooking, sometimes you need to make something that provides maximum impact with minimal effort, and this is one such dish. Biff Rydberg is a Swedish classic and its name is said to originate from the now defunct, but once opulent, Hotel Rydberg in Stockholm, where it was probably first served.

In this dish, beef, potatoes and onions are cooked simply to remarkable effect. The original dish was also thought to include kidney from lamb, veal or pig, but this seems to have been dropped over the years. I like to add a dash of Worcestershire sauce to the beef to add a pleasing umami kick, while some people prefer to add a dollop of mustard- or horseradish-cream.

The only question left though is where to place that raw egg yolk you see in the picture above. Personally, I love squishing the yolk all over the potatoes, coating them in an unctuously smooth 'sauce.' Alternatively you can also mix everything together into a great big unholy mess. If raw egg yolk is not your thing then you can of course do as my wife, Mrs. Nibbler, does and place a fried egg on top instead. I promise I won't call you a wimp if you do. Honestly (ahem).
If you ever find yourself in Stockholm and have a craving for the real deal, then you'd be hard pressed to find a better example of Beef Rydberg than at Prinsen restaurant, which has been a Stockholm institution for over 100 years.

Ingredients (serves 4)
  • 600g beef fillet, cut into ¾ inch cubes
  • 800g potatoes, peeled and cut into ¾ inch cubes
  • 2 onions, roughly chopped
  • 4 egg yolks served in the shell (you can trim the edges of the shell with scissors to make it neater)
  • 50g butter (and some oil) for frying
  • A handful of chopped parsley
  • Worcestershire sauce
  • Salt and pepper to season
Method
  1. Parboil the potatoes for 5 mins
  2. Melt 25g of butter in a frying pan and fry the potatoes over a low/medium heat for 15-20 mins. Season with salt. Don't move the potatoes around too much, you want a nice crisp crust to form. You may want to add a touch of oil too to stop the butter burning.
  3. While the potatoes are cooking, gently fry the onions with the remaining butter in another pan over a low/medium heat for 15 mins and season with a touch of salt. The onions should be soft and golden and just starting to caramelise.
  4. After the onions have been cooking for 7 mins, drizzle the beef with a touch of oil, season with salt and pepper and sear in (yet another) hot pan for 3-4 mins until cooked medium-rare. Let the beef rest for 5 mins on a warm plate.
  5. To serve, place separate mounds of beef, onions and potatoes on a warmed plate. Sprinkle with chopped parsley (don't leave this out, it adds a crisp freshness to the dish), and place an egg yolk in the middle. I also like to add a few splashes of Worcestershire sauce over the beef. Serve with an ice cold beer or a glass of Pinot Noir.

25 March 2011

Ottolenghi Apple & Olive Oil Cake with Maple Icing – Recipe

One of the many things I miss about living in London is wandering up to Islington's Upper Street for a lazy weekend lunch at Ottolenghi. I went there for the friendly communal atmosphere and the beautifully vibrant and fresh food that would be laid out in abundant piles. To this day I've yet to have a broccoli dish as exciting as their chargrilled version with garlic and chilli. Oh, and the cakes. Definitely the cakes.
Naturally, as a fan of Ottolenghi's food, I went out and bought the cookbook when it came out a few years ago. Unfortunately it became one of those that sat untouched on my bookshelf, for I was never quite able (unsurprisingly) to replicate the magic in my own kitchen. It remained untouched until, that is, the other day when I was struck by an insatiable urge for cake. I dug out the book, and found this interesting recipe for apple cake that uses olive oil. I'll admit to being a tad sceptical, but the olive oil really works. I used regular olive oil, but I subsequently found out that you're meant to use extra virgin olive oil, which I imagine gives it even more depth of flavour. Next time, I suppose. I'd also be tempted to substitute the water the sultanas are soaked in for some sort of booze such as dark rum or sherry.

Anyway, it's a fairly straightforward recipe and the end result is decadently moreish. The cake benefits from a day or two in the fridge to allow the flavours to mature (just make sure you wrap it well in clingfilm and take it out of the fridge a couple of hours before icing and serving).

Ottolenghi Apple and Olive Oil Cake with Maple Icing
(taken from Ottolenghi: The Cookbook)

Ingredients (serves 6-8)
80g sultanas
4 tbsp water
280g plain flour
½ tsp ground cinnamon
¼ tsp salt
½ a teaspoon baking powder
1¼ tsp bicarbonate of soda
120ml extra virgin olive oil
160g caster sugar
½ vanilla pod
2 eggs, lightly beaten
3 Bramley/Granny Smith apples, peeled, cored and cut into 1cm dice (should be approx 360g)
Grated zest of 1 lemon
2 egg whites

For the Maple icing:
100g unsalted butter, at room temperature
100g light muscovado sugar
85ml maple syrup
220g cream cheese, at room temperature

Method
  1. Grease a 20-24cm springform non-stick cake tin. Place the sultanas and water (or booze) in a saucepan and simmer over a low heat until all of the water has been absorbed. Leave to cool.
  2. Preheat the oven to 170ºC. Sift together the flour, cinnamon, salt, baking powder and bicarbonate of soda and set aside.
  3. Put the oil and sugar into the bowl of an electric mixer fitted with a paddle attachment (or use an electric whisk). Slit the vanilla pod lengthwise and scrape the seeds out into the bowl. Beat the oil, sugar and vanilla together, then gradually add the eggs. Mix until smooth and thick. Add the diced apples, sultanas and lemon zest, then lightly fold in the dry ingredients.
  4. Whisk the egg whites in a separate bowl until they form soft peaks. Carefully fold them into the batter in 2 batches, trying to lose as little air as possible.
  5. Pour the batter into the cake tin, level it with a palette knife. Bake for 1½ hours, or until a skewer inserted in the centre comes out clean. Remove from the oven and let it cool in the tin.
  6. Once cold, remove the cake from the tin and cut the cake horizontally in half using a serrated knife.
  7. To make the icing, beat together the butter, muscovado sugar and maple syrup in an electric mixer until light and airy. Add the cream cheese and continue to beat until the icing is totally smooth.
  8. Using a palette knife spread a 1cm-thick layer of icing over the bottom half of the cake. Carefully place the top half on it. Spread the rest of the icing on top.

6 March 2011

Fastelavnsboller (Shrovetide Buns) – Recipe

It's Fastelavn today! In Christianity this festival (known as Shrovetide in English) marks the three days running up to Lent, which was historically a period of fasting and abstinence. However, I'm more excited by the fact that it means Easter – and therefore the end of the interminable Norwegian winter – can't be too far away. True to form, the weather in Oslo these days appears to be behaving itself and the thermometer outside has been tentatively poking its head above freezing point.

Fastelavn also traditionally marks the beginning of a period of feasting before the austere Lent period. It is said that one tradition at this time in Norway was to eat nine meals in each corner of the house. Old Pagan rituals also form a traditional part of Fastelavn in Norway, and one such tradition is the 'Fastelavsnris,' where birch twigs are placed in a vase and decorated with garishly coloured feathers. Apparently birch was viewed as a symbol of fertility.

Another tradition at this time of year in Norway is to make Fastelavnsboller – sweet buns that are filled with whipped cream. I suppose they once would have been the perfect way of fattening yourself up before Lent; now, instead, they are a deliciously decadent treat.

Norwegians have baking in their blood, and Mrs. Nibbler is no exception. Therefore, as I've mentioned before, she does most of the baking in our household and today I was treated to these beauties. To make Fastelavnsboller, she used the same dough recipe as for her skolebrød buns. Traditionally these buns are filled with whipped cream, but you could also add jam too. Another nice touch I think is to use crème pâtissière instead of the whipped cream.


Ingredients (makes around 20 buns)
  • 800g plain white flour
  • 140g caster sugar
  • 150g butter
  • 50g fresh yeast (preferably) or one 7g packet of dried yeast
  • 525ml whole milk
  • 1 tsp ground cardamom
  • 300 ml whipping cream
  • Icing sugar
  • 1 egg
 Method
  1. Melt the butter
  2. Mix the flour, sugar and cardamom in a bowl (and dried yeast if using that)
  3. If using fresh yeast, mix this with some of the milk in a cup
  4. Mix the rest of the milk with the warm melted butter
  5. Add the milk, butter and yeast mix (if applicable) to the flour/sugar, and mix well (with an electric mixer preferably)
  6. Leave the dough to rise so that it doubles in size (takes approximately 1 hour if you put the bowl in a sink with hot water)
  7. Cut the dough into 3 equal pieces, and roll each piece into a long sausage. Cut each sausage into smaller pieces, and make each piece into a round ball about the size of a mandarin orange to make buns. Put each bun on a baking sheet.
  8. Leave the buns to rise further for approx 15 mins
  9. Brush the buns lightly with some beaten egg
  10. Cook the buns in the oven for approx 8-10 minutes on 230°C (sometimes longer, depending on the size of the buns). When the buns have a light brown ring underneath them and a light brown colour on top, they should be cooked.
  11. Remove the buns from the oven and leave to cool on a wire rack
  12. Meanwhile, whip the cream, adding some caster sugar to taste
  13. Once cool, slice the buns in half and fill with whipped cream
  14. Dust the buns with icing sugar and serve!

21 February 2011

Butter Shortbread with Cloudberry Cream – Recipe


Shortbread is so simple to make and is the perfect accompaniment to a reviving afternoon mug of builders' tea. I had always assumed shortbread biscuits were the sole preserve of the British, having originated in Scotland, so I was a little surprised to learn that there is a strong tradition of making shortbread across Scandinavia. In Sweden these biscuits are evocatively known as drömmar, or 'dreams' in English, while in Denmark pebernødder biscuits have a touch of cardamom and cinnamon in them and are popular at Christmas time. I haven't been able to find a definitive translation in Norwegian. The closest I can get to is småkaker av mørdeig, literally 'small cakes of shortcrust',  or smørkaker (butter cakes), so if anyone can shed some light on this I'd be very grateful.

I thought I'd add even more of a Scandinavian twist to these shortbread biscuits by making some cloudberry cream to serve alongside them. Cloudberries (molte in Norwegian) are quintessentially Scandinavian. These hardy berries grow across the Nordics and can survive temperatures as low as  -40°C. Cloudberries are somewhat elusive; appearing in late July they are gone by early August. They are also very difficult to cultivate and, as such, are considered a rare and expensive delicacy. My in-laws regularly go cloudberry picking near their home in the hills of Gudbrandsdalen every summer, jealously guarding the best spots (although they have promised to reveal their secrets to me someday). So why all the fuss then? Well, quite simply, the taste of cloudberries is extraordinary and unlike any other – sweet, with an intense floral aroma that is musky, exotic even. I like to eat them fresh, with a sprinkling of sugar, maybe a drizzle of cream too if you insist. As their season is so short it is most common to find cloudberries in jam form. Here I use cloudberry compote made by gently cooking cloudberries with sugar.

Ingredients (makes 8-10 biscuits)
For the shortbread:

  • 180g plain white flour
  • 125g unsalted butter
  • 55g caster sugar

For the cloudberry cream:

  • 200ml whipping cream
  • 1 tbsp caster sugar
  • 4 tbsp cloudberry compote

Method
To make the shortbread biscuits:

  1. Preheat the over to 180°C
  2. Beat together the butter and sugar
  3. Sift in the flour and mix together; it will look a bit like breadcrumbs at this stage
  4. Turn out the mixture onto a work surface and combine to make a dough
  5. Roll the dough into a cylinder about 3-inches thick
  6. Slice the cylinder into biscuits ½-inch thick and place on a baking tray
  7. Prick each biscuits 3-4 times with a fork
  8. Bake in the oven for 15-20 minutes until golden
  9. Once cooked, place on a wire rack to cool
  10. Before serving, dust each biscuit with some caster sugar

To make the cloudberry cream:

  1. Add the sugar to the cream and whip to form soft peaks
  2. Gently fold in the cloudberry compote

Serve with a big mug of strong tea.

16 December 2010

Reindeer Stew (Reinsdyrgryte) with Thyme Dumplings – Recipe

Seasons greetings! Christmas is rapidly approaching, and what better way to usher in the yuletide festivities than by making a hearty reindeer stew.

Say what!

Yup, reindeer stew.

Oh, come on. Why are you looking at me like that? Now I know for some, the thought of eating Rudolph, Dasher, Prancer et al. may be horrifying, but hear me out; this is no time for anthropomorphic sentimentality – reindeer meat is a delicious treat that should not be missed! It has a wonderful taste, akin to a gamier version of venison, and is tender, very lean, and packed with vitamin E and omega-3. The meat is extraordinarily dark, so much so that if you didn't know better you'd think it had been smoked. Reindeers have been a part of Nordic cuisine for hundreds of years, and its meat is widely eaten here in Norway. Reindeer meat is free-range, sustainable, and healthy – perhaps just the sort of thing we should be eating more of?

Reindeers have been an integral part of the identity of the Sami people for centuries. The Sami are the Nordic's only indigenous population and they predominantly live in northern Norway (with some also living in Sweden, Finland and Russia). It is estimated that around 10% of the Sami population is involved with reindeer husbandry. Reindeers in Norway are semi-wild; they are allowed to roam freely in Finnmark, way up in the Arctic Circle. However, it is the Sami people who shepherd them on the long journey from their inland winter breeding grounds to the spring grazing pastures on the coast and back again. Traditionally the whole family would be involved, and along the way they would sleep in lavvu tents, gathering round campfires to sing evocative yoiks (a traditional form of Sami song). Nowadays, snowmobiles have replaced skis, but the core of this fascinating tradition remains intact and unchanged. (For some truly stunning photos of Sami culture, check out the work of Erika Larsen).
Photo © Richard Canadas
Now that the temperatures here in Norway have plummeted, huddling round the dinner table with a piping hot plate of stew is just so warming and comforting. With young kids in the house it's also great to be able to make something that doesn't need much attention, and stews fit the bill perfectly.

There is a traditional Norwegian reindeer stew called Finnbiff, made with frozen shavings of reindeer meat, cream, mushrooms, and bacon. Although tasty enough, I wanted to make something a bit different, so I devised a simple recipe that is not too dissimilar from a classic beef bourguignon. The base is a standard mirepoix, to which I add game stock and red wine. Reindeer goes so well with juniper berries, so I throw in a few lightly crushed berries to give that lovely distinctive juniper note to the dish. I also bulk it out with some delicious and easy thyme dumplings which are adapted from a Jamie Oliver recipe. Just try not to hum "Rudolph the Red-Nosed Reindeer" while you make this, as I caught myself subconsciously doing!
 Ingredients (serves 4)
  • 600g reindeer meat (preferably shoulder), cut into cubes
  • 150g bacon, sliced
  • 1 carrot, chopped
  • 2 sticks of celery, chopped
  • 1 onion, chopped
  • 2 cloves garlic, finely chopped
  • 400ml game stock (or use beef stock)
  • ½ bottle decent red wine
  • 200g button mushrooms, sliced
  • 3 juniper berries, lightly crushed
  • 1 bay leaf
  • 2tbsp plain flour
For the dumplings:
  • 200g self-raising flour
  • 105g butter
  • 2tbsp thyme, chopped
  • a little water
Method
  1. Fry the bacon in a little olive oil in a suitable casserole pan
  2. Add the carrots, onion, celery, and garlic and continue to cook gently until softened
  3. Remove the vegetables from the pan and set aside
  4. Dust the reindeer meat with seasoned flour, add a bit more oil to the pan and turn up the heat
  5. Brown the reindeer meat; you may need to do this in two batches
  6. Add the cooked vegetables back into the pan, along with the wine, stock, mushrooms, bay leaf and juniper berries and bring to the simmer
  7. Meanwhile, to make the thyme dumplings, place the ingredients into a food processor and blitz until you get a fine breadcrumb-like consistency. Now add a touch of water gradually, until you get a firm, but not too wet dough.
  8. Form the dough into golf ball-sized balls and float them on the top of the stew
  9. Cover and cook on a very low heat for 1½ – 2 hours
  10. Serve with lots of buttered green beans

24 November 2010

Rømmevafler (Sour Cream Waffles) – Recipe

Little Miss Nibbler (age four years and one week) is learning about hibernation in her kindergarten at the moment. I arrive home to her regaling me with vague tales of slumbering bears and snoozing hedgehogs. I listen patiently, as I've learnt to do, but occasionally my mind wanders, to be filled with fantastical thoughts of spending the winter cocooned under my duvet in a reduced metabolic state. In preparation for this self-imposed lethargy, the body must prepare itself with calories. Lots of calories! Not that I really need the extra insulation, but there is one dish that would fit the bill perfectly: rømmevafler, or Norwegian sour cream waffles. Short of mainlining butter I can't think of a more efficient calorie delivery system, and as a pleasant side effect these waffles are utterly delicious.

Waffles can be found all over Norway and they are eaten like they're going out of fashion, typically as an afternoon treat. There are quite a few different recipes out there, but the two main types are those made with and without sour cream, some even add a touch of cardamom to the batter. Unlike their distant American relative, these waffles are relatively thin (about ⅓-inch thick) and are typically made in waffle irons that produce heart-shaped segments with shallow indentations. However, the real difference is in the batter. Norwegian waffles are richer and slightly denser – all the better for filling you up after a hard day's walking or skiing in the mountains – and sour cream waffles in particular are rib-stickingly good.

Norwegian waffles are typically eaten with brunost (Norwegian brown cheese) or jam, the latter possibly accompanied by some extra sour cream, if what's in the waffles isn't already enough for you. In the photo above you'll see a fork and a knife, however true Norwegians eat their waffles with their hands. You just tear off a segment and fold it in two so the filling doesn't fall out.

I've mentioned before that most of the baking in our household is done by Mrs. Nibbler, and as a true Norwegian she is almost obsessive about baked goods. This version of rømmevafler comes from Mrs. Nibbler's magic book of family recipes, but it's a fairly standard one. These should really be made with Norwegian sour cream (seterrømme), which is quite thick, almost like crème fraîche. But if you can't get hold of some then I've included another equally delicious waffle recipe. Be warned though; one waffle is never enough, but two will leave you in a food-induced coma on the sofa.
Rømmevafler – Ingredients (makes a few waffles)
  • 500 ml seterrømme (thick Norwegian sour cream, 35% fat)
  • 300 ml plain flour
  • 150 ml water
  • 2 tbsp melted butter
  • pinch of salt
  • 1 tsp baking powder
Regular Waffles – Ingredients
  • 500 ml buttermilk
  • 2 eggs
  • 150 g plain flour
  • 50 g unsalted butter, melted
  • 1 tbsp sugar
  • 1 tsp baking powder
Method (for both varieties)
  1. Whisk all the ingredients together until you get a smooth batter and leave to rest for 10 minutes
  2. Heat up a waffle iron
  3. Lightly brush the waffle iron with butter
  4. Using a ladle pour the batter into the waffle iron and leave for 2-3 minutes until they are cooked
  5. Remove waffle and eat with dollops of strawberry jam, brown cheese, or even maple syrup!
So there you go. If you're after something warm and sweet and cosseting, perhaps after a day spent outdoors, or indeed if you are planning on going into hibernation, then why not give these waffles a try. You won't be disappointed.

8 November 2010

Lapskaus: a Hearty Norwegian Stew - Recipe

At this time of year in Norway comfort foods really come into their own. In the Nibbler kitchen hearty dishes such as unctuous braises, calming casseroles and soothing soups are the order of the day, providing succour against nature’s relentlessly cold and wet onslaught. Perhaps nothing is designed to warm the belly and breathe fire into the soul as well as the Norwegian dish of lapskaus. Not to be confused with its Germanic cousin – labskaus – this stout, no-nonsense Norwegian stew is born of this rugged land and is enjoyed all over the country.

At its heart, lapskaus is a stew of meat and root vegetables. The main types of lapskaus are: lys (light) lapskaus, made with lightly salted pork knuckle; suppelapskaus, which is a thinner, soupier type of stew; and brun (brown) lapskaus, which uses beef and stock or gravy to make a rich, thick stew. Like most stews, though, there are a myriad of variations. Some add onions, garlic, bacon or mushrooms, some like it thin and watery, others so thick you need to cut it with a knife. There isn't really a 'correct' version, but as this was the first time I tried to make it, I wanted to make something as close to 'original' as I could.

I made a brun lapskaus with beef, but lightened it a touch by using fresh chicken stock. You should pick a cut of beef from a part of the animal that has worked for a living. The long, slow cooking will transform the tough cuts into chunks of meltingly tender meat. I used chuck steak, but brisket or flank would also be suitable.

For the root vegetables I used the common earthy ensemble of potatoes, carrots, swede (rutabaga), and parsley root. The edges of the potatoes will gradually dissolve into the stew, making it thicker. I chop the potatoes a bit smaller than the rest of the vegetables to help this process. The idea, though, is not to stir too much during cooking; otherwise the vegetables will just disintegrate.

Lapskaus is best served with lots of flatbrød (flat bread) and sprinkled with freshly chopped parsley – don't leave this out as its flavour here is a fantastic addition and really lifts the dish. And, like most stews, it tastes even better the next day.

Ingredients (serves 6-8)
  • 1.3 kg chuck steak (off the bone and trimmed of excess fat), cut into ¾-inch pieces
  • 6 large carrots, chopped into ¾-inch pieces
  • 300 g parsley roots, chopped into ¾-inch pieces
  • 750 g swede (rutabaga), chopped into ¾-inch pieces
  • 1 kg floury potatoes such as Kerrs Pink or Maris Piper, chopped into ½-inch cubes
  • 1.5 ltr fresh chicken stock
  • 30g butter
  • Freshly chopped parsley to garnish
  • Salt and freshly ground pepper to taste
Method
  1. Melt the butter in a large casserole pot and brown the meat in batches
  2. Add the chopped vegetables and the browned meat, pour over the stock and add some salt and pepper
  3. Bring to the boil. You may need to skim the stew a couple of times
  4. Cover the casserole with a tight fitting lid and let it simmer gently for 2½ hours, but don't stir too often otherwise the vegetables will turn to mush
  5. After 2½ hours or so the meat should be very tender, check and adjust seasoning if necessary. If the stew is too thick you can always thin it out with more stock or water
  6. Serve in large bowls, sprinkle with freshly chopped parsley and serve with plenty of of flatbrød

3 November 2010

Bergen Fish Soup (Bergensk Fiskesuppe) - Recipe

As I look outside the window these days, all I can see are grey sheets of icy rain. The weather in Oslo at this time of year is truly execrable - the mild days of early autumn are well and truly behind us, yet the beautiful snow of winter is yet to arrive. Instead, we live in this cold, windy, and wet limbo.  It is what I like to call 'soup weather'. There's nothing more comforting on days like these than a big bowl of steaming hot soup. It is the culinary equivalent of a chunky woollen jumper or a roaring log fire. I especially like to make soup on those chilly and wet weekends, when you've barely managed to get out of your pyjamas, and it seems like a major achievement to have emptied the dishwasher.

One of my favourite soups is the famous fish soup from Bergen, on the West Coast of Norway. Although the soup originates from Bergen, it is consumed and loved all over Norway, and it seems that everyone has their own version of it. Think of it as Norway's chicken noodle soup - perfect food for warming the soul.

Bergen fish soup is a velvety mix of cream, fish, and root vegetables that is lifted with a touch of sugar and vinegar. The trick with this soup is to taste as you go along to get the right balance of sweetness and sourness. Everyone will have different preferences, so feel free to experiment, but there should be just a subtle sweet-and-sour taste to it. The ultimate quality of the soup, though, is totally reliant on you using really good quality fish stock (preferably homemade from fish trimmings) and impeccably fresh fish - it doesn't really matter what type you use as long as it's not too oily; I think a mix of cod, salmon, halibut, and monkfish works best. Although not strictly traditional, and I haven't here, you could also add a few mussels to the pot 3-4 minutes before the soup has finished cooking. Another little optional extra is to add fish dumplings. Here, I made my own dumplings, but in Norway most fishmongers make their own excellent fiskepudding that you could use instead.

So, why not try making this simple soup - the very essence of the sea - which warms and soothes during these damp, chilly days.

Ingredients (serves 4-6)
  • 2 ltrs good quality fish stock
  • 2 carrots, diced into ½-inch cubes
  • 2 celery stalks, sliced
  • 1 small celeriac, diced into ½-inch cubes
  • 1 parsley root (or parsnip), diced into ½-inch cubes
  • 125g cod fillet (skin and bones removed) cut into 1-inch cubes
  • 125g halibut (skin and bones removed) cut into 1-inch cubes
  • 125g salmon (skin and bones removed) cut into 1-inch cubes
  • 125g monkfish tail cut into 1-inch cubes
  • 125g fiskepudding (or homemade fish dumplings. Optional, but see below for recipe)
  • 1 tbsp plain flour
  • 300ml double cream
  • 2 tbsp good quality red wine vinegar (to taste)
  • 1 tbsp sugar (to taste)
  • Salt and freshly ground white pepper
  • A handful of chopped chives to garnish
Method
  1. Bring the fish stock to boil in a large pot
  2. Add the chopped vegetables and simmer for 5 minutes
  3. Whisk the flour into the cream and add to the soup, and bring to the boil
  4. Add the sugar and the vinegar gradually and taste to get the right balance between sweet and sour
  5. Add the fish and fiskepudding/dumplings and simmer until the fish is just cooked (around 6-7 minutes)
  6. Season to taste with salt and freshly ground white pepper and sprinkle with some finely chopped chives
  7. Serve with lots of crusty white bread to dunk in the soup
For the fish dumplings (optional)
  • 125g cod fillet (skin and bones removed)
  • 1 small egg
  • 1 tbsp corn flour
  • Salt and white pepper to taste
Blitz all the ingredients in a food processer so that it forms a smooth paste then, using a spoon, form the mixture into small balls and add to the soup just after adding the fish - they should float gently on the surface of the soup.

31 October 2010

"Knask Eller Knep" (Trick or Treat)


Halloween is a relatively new phenomenon in Norway. It was almost unheard of to celebrate All Hallows' Eve here until probably the late 90s. But it has rapidly caught on as a tradition and it's now quite common (at least in Oslo) to see groups of kids going door-to-door saying "knask eller knep", and shops are full of pumpkins and all things orange and black at this time of year. Not everyone seems to quite understand the tradition, though, as you'll often see kids trick-or-treating a few days either side of Halloween itself; close but no (chocolate) cigar.

Like it or loathe it, when you have kids in the house, Halloween can serve as useful entertainment for their hyperactive little minds. The eldest Nibbler girl will soon be four-years-old so she's at the age where this sort of thing appeals immensely. I can just imagine the thought process and the startling realisation of the implications of this day: "You mean all I have to do is ask for sweets? And then people give me some." I am really thinking of getting her into a 12-step programme for sugar addiction.


So, this year we kept our lights on and actually answered the incessant buzzing of the doorbell for once. It's for the kids, innit. For our first Halloween proper in Norway I decided to make cupcakes. I've had a craving for these things since seeing the glorious cupcakes at Sprinkles in Chicago this summer. I bought some food colouring, hoping to make the icing in lurid, unnatural colours. However, it didn't quite turn out as I hoped for, and instead I ended up with pastel shades of green and yellow. Oh well, they still tasted good.

Ingredients (makes 18 cupcakes)
  • 250g unsalted butter, softened a touch
  • 250g caster sugar
  • 250g self-raising flour
  • 4 eggs
  • 1 tsp baking powder
For the icing:
  • 200g unsalted butter, softened a touch
  • 400g icing sugar
  • 2-3 tbsp milk
  • 1 tsp vanilla extract
  • a few drops food colouring (optional)
Method
  1. Preheat oven to 170°C (fan oven 150°C)
  2. Line cupcake tray with paper muffin cases
  3. Mix together all cupcake ingredients in an electric mixer until light and fluffy
  4. Spoon mixture into muffin cases and bake in oven for 20 minutes
  5. Let cool slightly in the tin then place on wire rack to cool
  6. To make the icing beat the butter and a third of the sugar in a mixer
  7. Add the next third of the sugar along with a tablespoon of milk and the vanilla extract
  8. Add the final third of the sugar and another tablespoon of milk, adding more milk if needed, and continue to beat until smooth
  9. If using, add the food colouring until you have the right shade of colour
  10. When the cupcakes are cool, pipe the icing on the cupcakes

26 October 2010

Tagliatelle with Mussels from Snadder & Snaskum


I am Nordic Nibbler and I am a cookbookaholic. There, I've said it. Rarely can I browse Amazon without falling spectacularly off the wagon, and I am now on first name terms with the UPS guy. Does anyone else get that giddy sense of excitement as you carefully prise open the cardboard box, guffaw at the mildly ridiculous air-filled plastic packing pillows, and then smile at the heady scent of freshly printed books? No? Maybe it's just me then.

One of my latest purchases was Theo Randall's fantastic book, Pasta. For those that don't know, Randall shot to prominence as head chef of the legendary River Café in London's Hammersmith where he worked for 17 years. This iconic restaurant has probably done more to introduce sublime Italian home cooking to the UK than any other. Its alumni include Jamie Oliver, Hugh Fearnley-Whittingstall, and April Bloomfield (of Spotted Pig fame), and it is still seen as the benchmark for Italian cooking in the UK. In 2006 Randall set up his own restaurant at the rather anonymous Intercontinental Hotel in London's Park Lane, where you can taste his food today.

As its name suggests, the book is an ode to pasta, comprising of over a hundred recipes for dried and fresh pasta. The book is divided by main ingredients: seafood, meat, cheese, mushrooms, etc. It's a very accessible and easy-reading book and is packed with useful tips on preparing and cooking pasta.

Given that I had just bought some mussels, a recipe that stood out for me was one for tagliatelle with mussels and saffron. This is an amazingly simple dish to make but, as always with simple dishes, the key is to use the very best quality ingredients you can get your hands on. If you like, you can make your own fresh pasta, but I don't think it's necessary here - I love the al dente chewiness and bounce of dried pasta, and my favourite brand is De Cecco.


The star of this dish, though, is the mussels, and here I'm using something rather special: Norwegian mussels from the fantastically named Snadder & Snaskum which are farmed in the Verrasundet Fjord, not far from the West Coast town of Trondheim. I first came across these at my local fishmonger and then again at the recent Matstreif Food Festival in Oslo. They are quite simply some of the best mussels I have every tasted. They look so beautiful - vibrant, iridescent blue shells, like glistening lapis lazuli gemstones. They have won awards as Norway's best mussels and I can clearly see why. The cold, salt water currents of the Verrasundet Fjord provide ideal growing conditions for mussels. The result is a mussel with plump, soft meat that has a sweet and slightly salty taste to it. They are just superb specimens, and real showcase for the quality of seafood Norway has to offer.


The combination of wine, cream, saffron and shellfish is always a winner, and this dish is no exception. This recipe would make a perfect light lunch, or late supper. It would also be ideal in smaller portions as a starter.

Ingredients (serves 4)
  • 1kg fresh mussels
  • 250g tagliatelle (fresh or dried)
  • 2 tbsp olive oil
  • 1 garlic clove, thinly sliced
  • a pinch of dried chili flakes
  • a glass of dry white wine
  • a pinch of saffron strands
  • 1 tbsp chopped flat-leaf parsley
  • 75ml double cream
  • salt and freshly ground black pepper
Method
  1. Scrub the mussels and remove the frilly 'beards', discarding any mussels that don't close when lightly tapped
  2. Put the oil, garlic, and chili into a large sauce pan and cook for 1 minute
  3. Turn the heat up and add the mussels and cover with a tight fitting lid
  4. Cook the mussels for 2 minutes then remove the lid and add the white wine
  5. Cover and cook for another 2-3 minutes until the mussels have opened
  6. Drain the mussels, keeping the cooking liquid, and remove from their shells, discarding any closed mussels
  7. Cook the tagliatelle in plenty of boiling salted water until 'al dente'
  8. While the pasta is cooking, put the cooking liquid from the mussels, saffron, and cream into a saucepan and simmer gently for 3 minutes until the sauce thickens slightly
  9. Add the mussels and parsley to the sauce and warm through for a few seconds, taste and adjust the seasoning 
  10. Drain the tagliatelle and toss the pasta in the sauce (you can add a few spoonfuls of the cooking water from the pasta to loosen the sauce if needed)
  11. Serve in warmed bowls, perhaps with a glass of wine - anything cold and white would be appropriate here

10 October 2010

Fru Ingrid's Brunost Is (Brown Cheese Ice Cream) - Recipe


"Brunost ice cream. Are you sure?"

Oh yes.

"You're going to put brown goat's cheese in ... er ... ice cream?"

Indeed, I am.

"And then eat it?"

You bet.

I can't take all the credit for this unusual, but insanely delicious, invention. In fact, I can't take any credit, as it is the creation of Ingrid Hov Lunde from the wonderful Røisheim Inn in Bøverdalen. I admit I was more than a touch sceptical when this dish was first presented to me there, but Fru Ingrid had prepared a truly astounding dessert of marinated wild berries that was served with brunost ice cream. It was utterly gorgeous.

For those that don't know, brunost (also known as geitost) is a traditional Norwegian cheese that is made from the whey of goats' milk that has been boiled until the sugars have caramelised, giving it its distinctive brown colour. It has an unusual salty and sweet flavour to it, and tastes nothing like cheese (for more on brunost you can read my earlier post here).

The more I thought about it, the more I realised how perfect the confluence of these flavours is: vanilla ice cream mixed with salty, caramelised 'cheese', with notes of burnt sugar and even the merest hint of coffee. In fact, it is very similar to the well-established and equally delicious salted caramel ice cream. So when I received a belated birthday gift of a much wished-for ice cream machine, I knew exactly what I was going to attempt to make first.
Ingrid has her own recipe for brunost ice cream in her excellent cookbook, Fru Ingrid på Røisheim, but I decided to improvise and make my own, using a standard vanilla ice cream recipe as the base. I used an extra rich brunost called stølstype, which is a dark, traditional style of brunost and resembles that which would have been made on old seter (a summer farm house). Ingrid also lists the recipe for the marinated berries I originally had with it, but I skipped that this time, preferring the pure hit of brunost ice cream instead. It's quite rich, so a little goes a long way. For variation you could also add some crushed green or brown cardamom pods to the milk at the steeping stage.

Ingredients (makes about 1ltr of ice cream)
  • 250ml whole milk
  • 200ml cream (around 40% fat)
  • 5 egg yolks
  • 130g caster sugar
  • 100-120g brunost (Norwegian brown cheese)
  • ½ a vanilla pod
Method
  1. Put the milk and cream into a saucepan and add the sliced brunost to it
  2. Cut the vanilla pod in half lengthwise, scrape out the seeds and place seeds and pod into the milk/cream
  3. Gently heat the milk/cream until it has almost boiled and the brunost has melted. Stir constantly.
  4. Remove from the heat and leave for half an hour to let the vanilla infuse into the milk
  5. Meanwhile, beat the egg yolk and the sugar until pale and fluffy
  6. Sieve the milk/cream mix and slowly pour onto the beaten egg yolks, stirring constantly
  7. Place the mixture into a clean saucepan and heat gently until it has almost boiled, stirring constantly so the mixture doesn't curdle. The custard should thicken and it is ready when it coats the back of a wooden spoon.
  8. Place the mixture into a pouring jug and put in the fridge until it is cool
  9. Slowly pour the mixture into an ice cream machine (make sure you have turned the machine on before you start pouring) and churn until almost frozen but still smooth (around 30 minutes)
  10. Eat straight away or keep in freezer until needed

29 September 2010

Fårikål - Recipe


September is the month when farmers in Norway bring their sheep down from their summer grazing pastures high up in the majestic mountains. The sheep have spent this time eating grass that is often intermingled with wild herbs. This has the effect of imparting such a wonderfully mild and fragrant aroma to the meat. As a result, Norwegian lamb is some of the best I have ever tasted.

There's nothing better to celebrate this wonderful bounty than making fårikål, a traditional Norwegian meal of lamb and cabbage (in fact the name, "får i kål", means just that - "sheep in cabbage"), which was voted the country's national dish in a radio programme in the 1970s. In fact, the last Thursday of September is Fårikålens Festdag (Fårikål Feast Day), and Norwegians celebrate this day by making this simple, but delicious dish. Such is their passion for this dish that Norwegians even have a National Fårikål Society, which opines on all things fårikål.

Fårikål is made from just two main ingredients: cabbage and lamb, but you can also use mutton instead (the older the animal, the stronger the taste). Therefore, the quality of each is imperative. The meat should be taken from the shoulder, neck or shank and should always be left on the bone and include some fat, which will soak into the cabbage, making them meltingly tender. The cabbage should be the best quality green cabbage you can find. Don't be tempted to use fancier varieties such as Savoy – fårikål is not a pretty dish, but what it lacks in visual appeal, it more than makes up for in flavour. This is one of those dishes that benefits from a day or two maturing in the fridge after you have made it, so make sure you make extra to save for later.

Traditionally, fårikål is served with boiled potatoes, deliciously thin and crisp Norwegian flatbrød (flat bread), and homemade lingonberry jam (just lingonberries and sugar mashed up, no cooking needed). The pan juices at the bottom of the casserole should be pored over the top of the lamb, as the water we added earlier will now have transformed itself into a rich and hearty lamb broth. You can pick out the whole peppercorns later if you like, but hardcore fårikål lovers will munch on these and think you a wimp if you do otherwise! Fårikål is best served with a glass of dark ale, or perhaps some fiery akevitt. It is a perfect warm, rib-sticking meal to have after spending the day walking in the mountains.

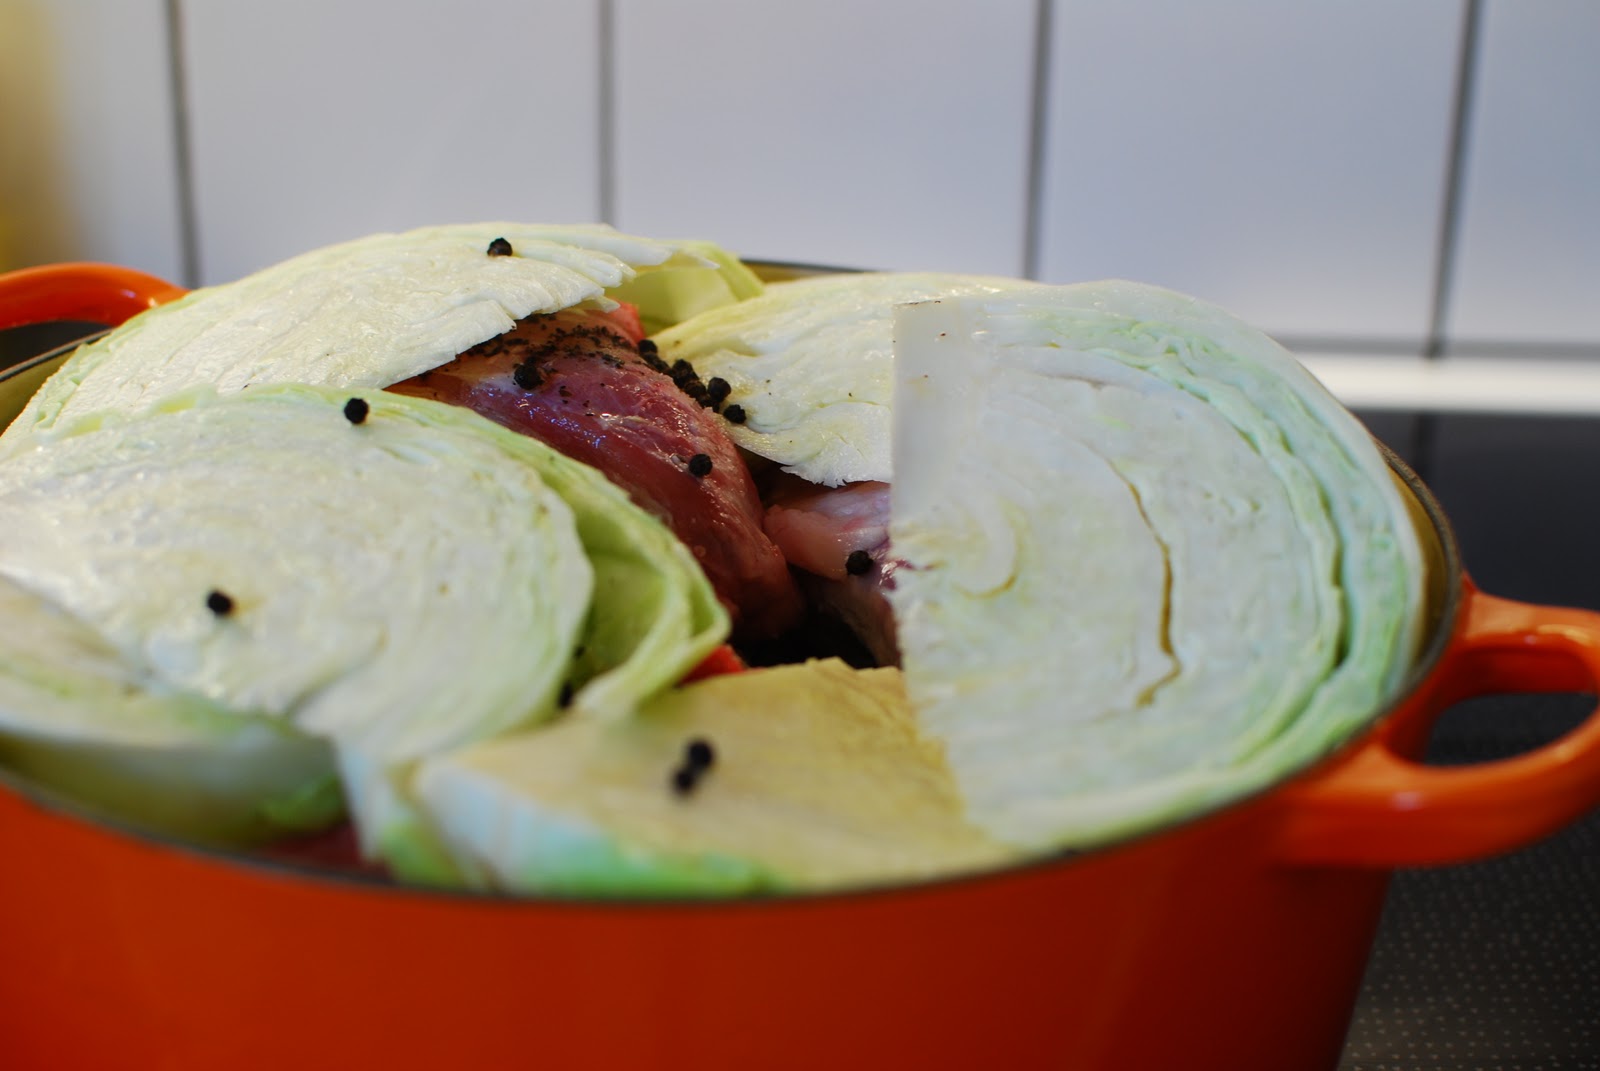
This recipe for fårikål comes courtesy of Grandma Nibbler, who made the delicious food you can see in the photo above (my inferior attempt can be seen in the photos below) - she even made her own flatbrød and lingonberry jam. However, I think she was somewhat bemused when I asked to take photos of the finished dish.


Ingredients (serves 6)
  • 2 ½ kg lamb/hogget/mutton on the bone (shoulder, shank or neck) cut into 3cm slices
  • 2 ½ kg green cabbage
  • 500ml water
  • 6 tsp whole black peppercorns
  • Salt, to taste (about 3 tsp or so)
Method
  1. Cut the cabbage into quarters down the core and cut each quarter into 3-4 wedges (the idea is to keep part of the core on each segment, which will hold the leaves together and prevent the whole thing disintegrating while cooking).
  2. Pour the water into a large casserole pot. Place a layer of lamb, then a layer of cabbage into the pot, seasoning each layer with salt and some of the whole peppercorns as you go.
  3. Repeat this layering process until you have used up all the ingredients. The final layer on the top should always be cabbage.
  4. Cover tightly and bring to the boil
  5. Simmer over a very low heat for 2-3 hours until the lamb is really tender and falling off the bone (check the water level now and then, making sure the pan doesn't run dry).
  6. Serve on warmed plates with boiled potatoes, flatbrød, and homemade lingonberry jam. The juices in the bottom of the pot make an excellent gravy.

16 September 2010

Raspberry Pavlova - Recipe


I love a good pavlova. It's such an iconic 80's dish and maybe just a touch naff. When I was a little kid, my mum used to always make a pavlova when she hosted dinner parties, which was garnished with slices of lurid green kiwis that probably fitted right in with the quiche, shoulder pads, and the obligatory post-dinner game of Twister.

Pavlova is a very simple dessert, and is essentially made from just four things: eggs, sugar, cream, and fruit, which is why it is imperative you use the very best examples of each ingredient. The heart of any good pavlova is a good meringue, which should be crisp on the outside and soft and moist in the middle, as there's very little joy in a totally dry meringue. There is something about meringues, though, that has always intrigued me. Their main ingredient, egg, is one of those magic foods that does things you would never have thought possible; can it really be that the same proteins that go rubbery white when hard boiled can also be coaxed into those soft, voluminous peaks you wished you could ski down?

Then there is the fruit, which should be tart and juicy to cut through the richness of the cream and the sweetness of the meringue. Raspberries are perfect and, as we're at the tail-end of the Norwegian raspberry season now, I managed to bag some excellent specimens to use. Alternatively, you could use strawberries, passion fruit, or peaches.

Here's a straightforward recipe for pavlova that I like to make when friends come round for dinner. Although simple, it never fails to bring a smile to the face. One bite of the sweet, crisp meringue tempered by the voluptuous cream and tangy fruit will have you humming Kajagoogoo songs in no time.

Ingredients (serves 6)
  • 7 large egg whites (at room temperature)
  • 350g caster sugar
  • 1 tbsp cornflour
  • 300ml whipping cream
  • 2 punnets of raspberries
Method
  1. Preheat the oven to 145°C (165°C for non-fan ovens)
  2. Beat the egg whites with an electric whisk or in a mixer until they form stiff peaks
  3. While whisking, slowly pour in the sugar so that it dissolves completely. The mixture will thicken and go glossy but don't over-whisk.
  4. Gently mix in the sifted cornflour
  5. Pour the mixture into a non-stick 23cm springform cake tin
  6. Place the cake tin in the oven for 1 hour
  7. After 1 hour, turn the oven off but leave the meringue in until it has cooled completely
  8. When cool, carefully run a knife round the edge to loosen the meringue from the sides of the tin and place meringue on a serving plate. It will break here and there but that just adds to its charm.
  9. When ready to serve, whip the cream until it forms soft, thick peaks, and carefully spread over the meringue
  10. Sprinkle the raspberries over the top and eat immediately